
Sign up into Fovea has few simple steps. Some of the steps need to be done by the users themselves and some by the Fovea administrator. The steps are:
- Register a new User.
- Email Verification to complete the Sign-Up Process
- Affiliating Users to Source systems
Tip:
-
Fovea can be accessed either from the cloud (hosted by Triyam) or on-premises.
-
For the cloud version, go to: https://livefovea.com/.
-
For the on-premises version, contact your in-house Fovea administrator or Triyam Support.
-
You can log in with a username and password or use Single Sign-On (SSO) via Active Directory or your EHR system.
Register a new User
Launch the Fovea URL
Launch the Fovea URL in your web browser and click on the "CREATE AN ACCOUNT" button.

Enter the following details.
Username:
Enter your official email address as the Username. Kindly avoid personal email addresses (yahoo, Hotmail, etc.).
Password:
Input your desired new password and make sure you set a strong password.
The typical format for a password in Fovea is:
- At least 8 characters in length.
- At least one uppercase letter (A-Z).
- At least one lowercase letter (a-z).
- At least one numeric digit (0-9).
- At least one special character (e.g., !, @, #, $, %, ^, &, *).
Captcha Code: Enter the displayed code. Use Click to change to refresh it.
Tick on the option below that says, “Please check the option to confirm that you have read the Fovea Service Agreement and privacy statement and authorize Triyam to process health information of your patients and manage the service as described”.
You may go through the “Privacy and Terms policy” by clicking on the “Fovea Service Agreement and privacy statement” link and then tick the above option.
Other buttons:
Back: Clicking on the Back button takes you to the previous page (Fovea Sign-in page). You may do this if you want to cancel the details entered and start a fresh.
Sign Up: Enter all the required details as specified above and click on the “Sign Up” button to proceed with registration. This takes you to the “Complete Registration” page displayed below.

Complete Registration
Enter the information in the screen that follows to “Complete registration”.
Tip: Only the fields marked with star are required to be filled in.
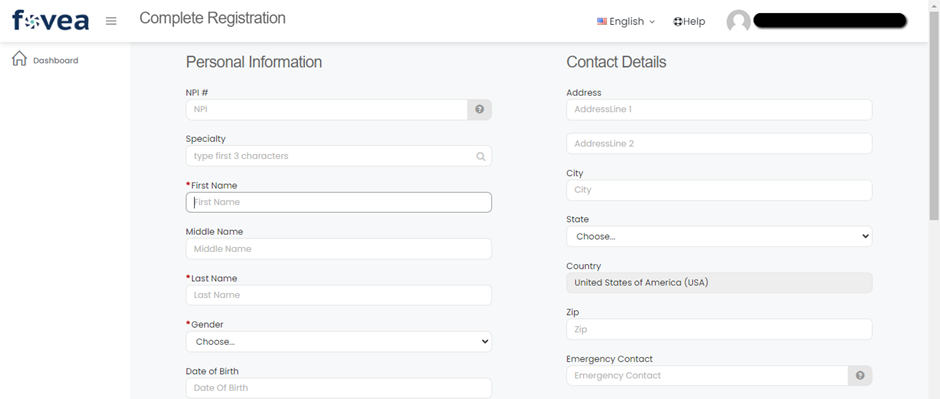
Required fields:
- First name
- Last name
- Gender
- Time zone
- Phone
- Security Question 1, 2, 3 and their respective answers.
Tip: Security questions are helpful to regain access into Fovea if users forget their passwords. So, please remember the answers to your security questions.

Optional fields:
- NPI: Enter your 10 digits NPI number.
- Specialty: Enter the area of specialization. If you type first three letters it will show some medical/surgical fields.
- Middle name: Enter the middle name with letters.
- Date of Birth: Enter mm/dd/yyyy format or choose date in date picker.
- Address: Enter the Address Line1 and Address Line2 fields
- City: Enter the city name
- State: Choose the state in drop down
- Country: Country (USA) is default
- Zip: Enter 9 digits zip code
- Emergency contact: Enter your digits emergency contact.
- Emergency phone: Enter your 10 digits emergency phone number.
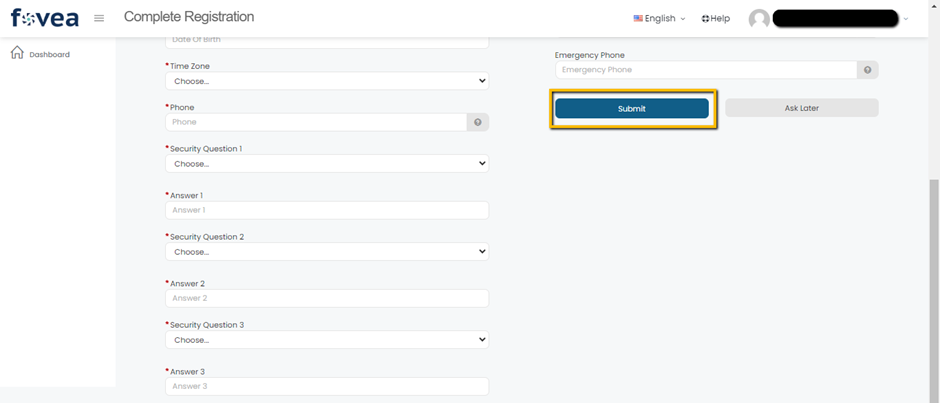
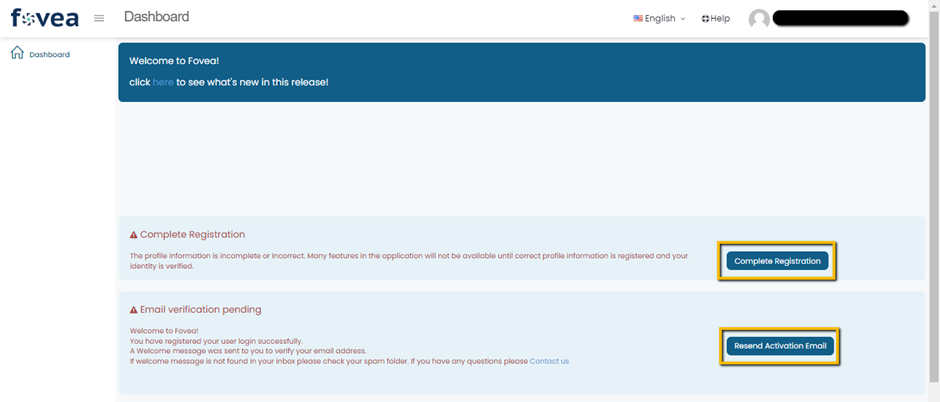
Click on the Submit button to complete the registration or click on Ask Later button to complete the registration later. To continue the registration later, go to dashboard and click on Complete Registration button.
after successful Registration process you will be prompted to verify your email address.
Begin by clicking on the Complete Registration button. On this page, you'll find text fields, including mandatory ones marked with asterisks, covering details like First Name, Last Name, Gender, Time Zone, City, and Phone Number.  Additionally, choose and answer three mandatory security questions for password recovery purposes. Once these fields are completed, click on the Submit button to complete the profile set up.
To verify your email address, please check the confirmation email sent to your registered email address. Click Confirm Email Address. You will be redirected to Fovea login page.
In case you didn't receive the welcome email, utilize the "Resend Activation Email" button, and check your inbox or spam folder again.
Tip: Sometimes the email may be found in your Spam folder, depending on your email server settings. Please add @triyam.com to your allowed contacts list to prevent this.


Tip: You can sign up for Fovea using a username and password or you can access Fovea via Single Sign on from Active Directory or your EHR application.
For more information on how Fovea is configured for your organization, please contact your in-house Fovea administrator or the Triyam support team.
Following these steps ensures the completion of both email verification and registration processes in Fovea.